PDF files have become the standard to view and share printed material. This page will show users how to turn Word documents into PDF files.
What you’re essentially doing is exporting the file as a PDF through the Macs print service. That may sound complicated but it’s actually quite simple. Here is exactly how to print PDF’s if you haven’t done so before in Mac OS X:
Locate the resulting document in the Finder or with another app, it’ll appear as a unique PDF file, and no, it will not overwrite or alter the origin file it was created from.
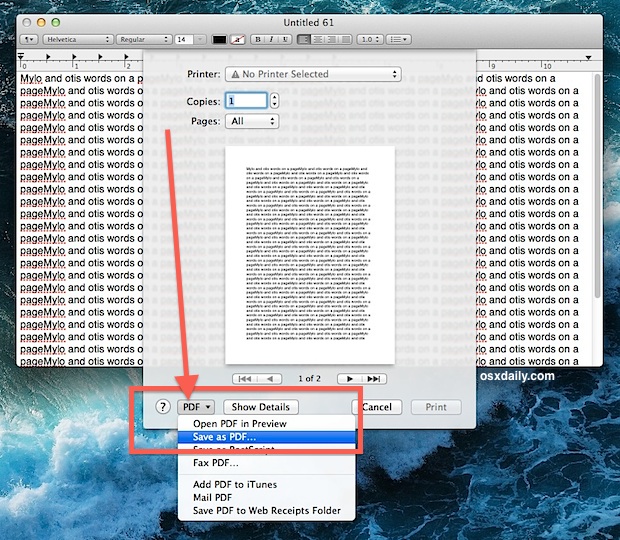
Here is an example of what the submenu looks like in most Mac apps, note there are other PDF saving options too but what we’re looking to do is “Save as PDF” which effectively prints the document precisely as it appears into a PDF document:

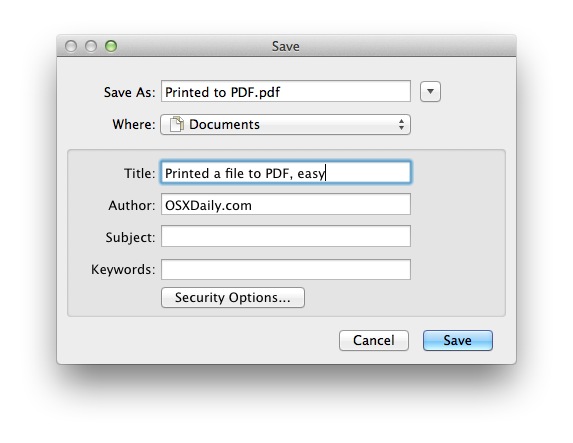
Going to save gives you a few options, specify a location other than Documents if desired, and you can fill out author information, the title of the PDF document, subject, keywords for searching within the document, and even specify a password and editing options by choosing “Security Options” if you want to protect the file from others having unauthorized access to it:

That’s all there is to it, you will now have a PDF file created instantly by the print function. You can then view it later, use your favorite PDF editor for Mac (or Windows/Linux) to edit the PDF, distribute it online with something like Amazon, ScribD, Google Docs, or whatever else you need it for.
Note that some apps like Google Chrome have a separate Print window, and you’ll find “Save as PDF” as a checkbox option in Chrome alongside “Destination” options. All else is the same though, and you’ll still wind up with the open document or web page being saved as a PDF file through the virtual printer engine of Mac OS X. Additionally, some applications have native “Export to PDF” functions built directly into them, though using those functions does not pass the origin document through the printer engine of Mac OS X and thus can have slightly different results.
This ability has been in Mac OS for a very long time, but it looks slightly different in older versions of Mac OS X and some things have slightly different language and options. Nonetheless, the general idea is the same and you shouldn’t have a problem working it out, whatever version of MacOS or Mac OS X you’re using.
Gathered from osxdaily.com
To Print to PDF in Windows 10, simply open up your document in a text editor like Microsoft Word and click File > Print. (You can do this from any program that lets you print -- not just Word, and not just with a text document.)

Under Printer or Destination, choose Print as a PDF.
Click Print and a window will open up, prompting you to title your newly created PDF file. Name it and click Save to save your document as a PDF.
In previous versions of Windows, creating a PDF is not quite as straightforward -- though many programs have "Save as PDF" or "Print to PDF" built-in (for example, Google Chrome). Windows 10's new Print to PDF feature is significant because it's independent of a specific program, which means it will work in any program that you can print from.
Print to PDF is different from Save as PDF because it only translates the information that you'd see on a printed page. This means that any metadata -- such as links and bookmarks -- will not be translated, and will not be visible to whomever is viewing the "printed" PDF file.
Once you finish your document, press Ctrl+P to go to the print screen.
Once you finish your document, press Ctrl+P to go to the print screen or click on FILE.

Once you finish your document, click on file on the upper left.

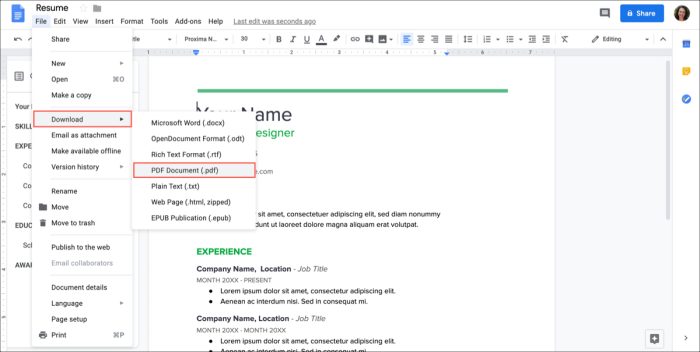
To create a PDF file from a Google Doc, follow the steps below:

To access Read aloud, open any PDF file in Microsoft Edge from your computer or from the web. In the toolbar along the top, you will see “Read aloud” as an option. Click/tap on the "A" button to start.

Once you start the read aloud process you have the option of changing voices, changing the speed of the voices, etc.

You can also highlight sections of a PDF and have Edge read that selection.

It is important to note that if you OCR (Optical Character Recognition) a PDF, the read aloud function in Edge will be able to easier read the characters in the PDF .